Android 2 – APP
Utwórz nowy projekt w swoim środowisku Android Studio, wypełniając wymagane dane.
1. Utwórz nowy projekt w Android Studio, przechodząc do File ⇒ New ⇒ New Projekt oraz nazwij aplikację androidhive w domenie com.example.
2. Otwórz plik AndroidManifest.xml i dodaj następujący kod. Najpierw dodaję wszystkie klasy, które tworzysz, do pliku manifestu. Dodaj również uprawnienia do połączenia z Internetem.
AndroidManifest.xml
<?xml version="1.0" encoding="utf-8"?>
<manifest xmlns:android="http://schemas.android.com/apk/res/android"
    package="com.example.androidhive"
    android:versionCode="1"
    android:versionName="1.0">

    <application
        android:configChanges="keyboardHidden|orientation"
        android:icon="@drawable/inwentory"
        android:label="@string/app_name" >

        <activity
            android:name=".MainScreenActivity"
            android:label="@string/app_name"
            android:launchMode="singleTop">
            <intent-filter>
                <action android:name="android.intent.action.MAIN" />

                <category android:name="android.intent.category.LAUNCHER" />
            </intent-filter>
        </activity>

        <!-- All Product Activity -->
        <activity
            android:name=".AllProductsActivity"
            android:label="Stan majątku"
            android:launchMode="singleTop"
            android:parentActivityName=".MainScreenActivity">
        </activity>

        <!-- Add Product Activity -->
        <activity
            android:name=".NewProductActivity"
            android:label="Dodaj nową pozycję"
            android:launchMode="singleTop"
            android:parentActivityName=".MainScreenActivity">
        </activity>

        <!-- Edit Product Activity -->
        <activity
            android:name=".EditProductActivity"
            android:label="Edycja elementu"
            android:launchMode="singleTop"
            android:parentActivityName=".AllProductsActivity">
        </activity>
     </application>

    <!--  Internet Permissions -->
    <uses-permission android:name="android.permission.INTERNET" />

</manifest>
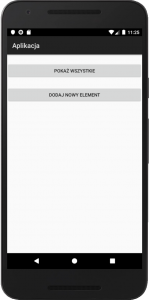
Teraz utwórz nowy plik xml w folderze res ⇒ i nadaj mu nazwę main_screen.xml Ten plik układu zawiera dwa proste przyciski do przeglądania wszystkich produktów i dodawania nowego produktu.
main_screen.xml
<?xml version="1.0" encoding="utf-8"?>
<LinearLayout xmlns:android="http://schemas.android.com/apk/res/android"
    android:layout_width="fill_parent"
    android:layout_height="fill_parent"
    android:gravity="center_horizontal"
    android:orientation="vertical">

    <!--  Sample Dashboard screen with Two buttons -->
    <!--  Button to view all products screen -->
    <Button
        android:id="@+id/btnViewProducts"
        android:layout_width="fill_parent"
        android:layout_height="wrap_content"
        android:layout_marginTop="25dip"
        android:text="Pokaż wszystkie" />

    <!--  Button to create a new product screen -->
    <Button
        android:id="@+id/btnCreateProduct"
        android:layout_width="fill_parent"
        android:layout_height="wrap_content"
        android:layout_marginTop="25dip"
        android:text="Dodaj nowy element" />

</LinearLayout>
Otwórz główną klasę aktywności, którą jest MainScreenActivity.java, i dopisz obsługę zdarzenia kliknięcia dla dwóch przycisków wymienionych w układzie main_screen.xml.
MainScreenActivity.java
package com.example.androidhive;

import android.app.Activity;
import android.content.Intent;
import android.os.Bundle;
import android.view.View;
import android.widget.Button;

public class MainScreenActivity extends Activity{

    Button btnViewProducts;
    Button btnNewProduct;

    @Override
    public void onCreate(Bundle savedInstanceState) {
        super.onCreate(savedInstanceState);
        setContentView(R.layout.main_screen);

        // Buttons
        btnViewProducts = (Button) findViewById(R.id.btnViewProducts);
        btnNewProduct = (Button) findViewById(R.id.btnCreateProduct);

        // view products click event
        btnViewProducts.setOnClickListener(new View.OnClickListener() {

            @Override
            public void onClick(View view) {
                // Launching All products Activity
                Intent i = new Intent(getApplicationContext(), AllProductsActivity.class);
                startActivity(i);

            }
        });

        // view products click event
        btnNewProduct.setOnClickListener(new View.OnClickListener() {

            @Override
            public void onClick(View view) {
                // Launching create new product activity
                Intent i = new Intent(getApplicationContext(), NewProductActivity.class);
                startActivity(i);

            }
        });
    }
}
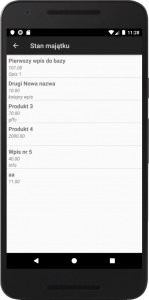
Wyświetlanie wszystkich produktów w widoku listy (odczyt)
Teraz potrzebujemy wyświetlić aktywność wyświetlającą wszystkie produkty w formacie widoku listy. Jak wiemy widok listy wymaga dwóch plików xml, jednego do widoku listy, a drugiego do pojedynczego wiersza listy. Utwórz dwa pliki xml w folderze res ⇒ i nadaj mu nazwę all_products.xml i list_item.xml
all_products.xml
<?xml version="1.0" encoding="utf-8"?>
<LinearLayout xmlns:android="http://schemas.android.com/apk/res/android"
    android:layout_width="fill_parent"
    android:layout_height="fill_parent"
    android:orientation="vertical">
    <!-- Main ListView
         Always give id value as list(@android:id/list)
    -->
    <ListView
        android:id="@android:id/list"
        android:layout_width="fill_parent"
        android:layout_height="wrap_content" />

</LinearLayout>
list_item.xml
<?xml version="1.0" encoding="utf-8"?>
<LinearLayout xmlns:android="http://schemas.android.com/apk/res/android"
    xmlns:tools="http://schemas.android.com/tools"
    android:layout_width="fill_parent"
    android:layout_height="wrap_content"
    android:orientation="vertical" >

    <!-- Product id (pid) - will be HIDDEN - used to pass to other activity -->
    <TextView
        android:id="@+id/pid"
        android:layout_width="370dp"
        android:layout_height="174dp"
        android:visibility="gone" />

    <!-- Name Label -->

    <TextView
        android:id="@+id/name"
        android:layout_width="match_parent"
        android:layout_height="wrap_content"
        android:paddingLeft="6dip"
        android:paddingTop="6dip"
        android:textSize="17dip"
        android:textStyle="bold" />

    <TextView
        android:id="@+id/price"
        android:layout_width="match_parent"
        android:layout_height="wrap_content"
        android:paddingLeft="6dip"
        android:textStyle="italic" />

    <TextView
        android:id="@+id/desc"
        android:layout_width="match_parent"
        android:layout_height="wrap_content"
        android:paddingLeft="6dip"
        android:textStyle="italic" />
</LinearLayout>
Utwórz nowy plik klasy i nazwij go AllProductsActivity.java. Kod będzie realizował następujące funkcje:
-> Najpierw żądanie jest wysyłane do pliku get_all_products.php przy użyciu wątku zadania Async w tle.
-> Po uzyskaniu JSON z get_all_products.php, przeanalizujemy go i wyświetlimy w widoku listy.
-> Jeśli nie znaleziono produktów, uruchamiany jest AddNewProductAcivity.
AllProductsActivity.java
package com.example.androidhive;

import java.util.ArrayList;
import java.util.HashMap;
import java.util.List;

import org.apache.http.NameValuePair;
import org.json.JSONArray;
import org.json.JSONException;
import org.json.JSONObject;

import android.app.ListActivity;
import android.app.ProgressDialog;
import android.content.Intent;
import android.os.AsyncTask;
import android.os.Bundle;
import android.util.Log;
import android.view.View;
import android.widget.AdapterView;
import android.widget.AdapterView.OnItemClickListener;
import android.widget.ListAdapter;
import android.widget.ListView;
import android.widget.SimpleAdapter;
import android.widget.TextView;

public class AllProductsActivity extends ListActivity {

// Progress Dialog
private ProgressDialog pDialog;

// Creating JSON Parser object
JSONParser jParser = new JSONParser();

ArrayList<HashMap<String, String>> productsList;

// url to get all products list
private static String url_all_products = "http://ip.ip.ip.ip/android/get_all_products.php";

// JSON Node names
private static final String TAG_SUCCESS = "success";
private static final String TAG_PRODUCTS = "products";
private static final String TAG_PID = "pid";
private static final String TAG_NAME = "name";
private static final String TAG_PRICE = "price";
private static final String TAG_DESCRIPTION = "description";
// products JSONArray
JSONArray products = null;

@Override
public void onCreate(Bundle savedInstanceState) {
super.onCreate(savedInstanceState);
setContentView(R.layout.all_products);

// Hashmap for ListView
productsList = new ArrayList<HashMap<String, String>>();

// Loading products in Background Thread
new LoadAllProducts().execute();

// Get listview
ListView lv = getListView();

// on seleting single product
// launching Edit Product Screen
lv.setOnItemClickListener(new OnItemClickListener() {

@Override
public void onItemClick(AdapterView<?> parent, View view,
int position, long id) {
// getting values from selected ListItem
String pid = ((TextView) view.findViewById(R.id.pid)).getText()
.toString();

// Starting new intent
Intent in = new Intent(getApplicationContext(),
EditProductActivity.class);
// sending pid to next activity
in.putExtra(TAG_PID, pid);

// starting new activity and expecting some response back
startActivityForResult(in, 100);
}
});

}

// Response from Edit Product Activity
@Override
protected void onActivityResult(int requestCode, int resultCode, Intent data) {
super.onActivityResult(requestCode, resultCode, data);
// if result code 100
if (resultCode == 100) {
// if result code 100 is received
// means user edited/deleted product
// reload this screen again
Intent intent = getIntent();
finish();
startActivity(intent);
}

}

/**
* Background Async Task to Load all product by making HTTP Request
* */
class LoadAllProducts extends AsyncTask<String, String, String> {

/**
* Before starting background thread Show Progress Dialog
* */
@Override
protected void onPreExecute() {
super.onPreExecute();
pDialog = new ProgressDialog(AllProductsActivity.this);
pDialog.setMessage("Ładuję dane. Proszę czekać...");
pDialog.setIndeterminate(false);
pDialog.setCancelable(false);
pDialog.show();
}

/**
* getting All products from url
* */
protected String doInBackground(String... args) {
// Building Parameters
List<NameValuePair> params = new ArrayList<NameValuePair>();
// getting JSON string from URL
JSONObject json = jParser.makeHttpRequest(url_all_products, "GET", params);

// Check your log cat for JSON reponse
Log.d("All Products: ", json.toString());

try {
// Checking for SUCCESS TAG
int success = json.getInt(TAG_SUCCESS);

if (success == 1) {
// products found
// Getting Array of Products
products = json.getJSONArray(TAG_PRODUCTS);

// looping through All Products
for (int i = 0; i < products.length(); i++) {
JSONObject c = products.getJSONObject(i);

// Storing each json item in variable
String id = c.getString(TAG_PID);
String name = c.getString(TAG_NAME);
String price = c.getString(TAG_PRICE);
String desc = c.getString(TAG_DESCRIPTION);

// creating new HashMap
HashMap<String, String> map = new HashMap<String, String>();

// adding each child node to HashMap key => value
map.put(TAG_PID, id);
map.put(TAG_NAME, name);
map.put(TAG_PRICE, price);
map.put(TAG_DESCRIPTION, desc);

// adding HashList to ArrayList
productsList.add(map);
}
} else {
// no products found
// Launch Add New product Activity
Intent i = new Intent(getApplicationContext(),
NewProductActivity.class);
// Closing all previous activities
i.addFlags(Intent.FLAG_ACTIVITY_CLEAR_TOP);
startActivity(i);
}
} catch (JSONException e) {
e.printStackTrace();
}

return null;
}

/**
* After completing background task Dismiss the progress dialog
* **/
protected void onPostExecute(String file_url) {
// dismiss the dialog after getting all products
pDialog.dismiss();
// updating UI from Background Thread
runOnUiThread(new Runnable() {
public void run() {
/**
* Updating parsed JSON data into ListView
* */
ListAdapter adapter = new SimpleAdapter(
AllProductsActivity.this, productsList,
R.layout.list_item, new String[] { TAG_PID,
TAG_NAME, TAG_PRICE, TAG_DESCRIPTION},
new int[] { R.id.pid, R.id.name, R.id.price, R.id.desc });
// updating listview
setListAdapter(adapter);
}
});

}

}
}
Dodawanie nowego produktu (zapis)
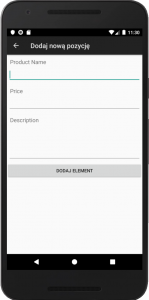
Utwórz nowy widok i działanie, aby dodać nowy produkt do bazy danych mysql. Utwórz prosty formularz zawierający EditText dla nazwy produktu, ceny i opisu.
Utwórz nowy plik xml i nazwij go jako add_product.xml i wklej następujący kod, aby utworzyć prosty formularz.
add_product.xml
<?xml version="1.0" encoding="utf-8"?>
<LinearLayout xmlns:android="http://schemas.android.com/apk/res/android"
android:layout_width="match_parent"
android:layout_height="match_parent"
android:orientation="vertical" >

<!-- Name Label -->
<TextView android:layout_width="fill_parent"
android:layout_height="wrap_content"
android:text="Product Name"
android:paddingLeft="10dip"
android:paddingRight="10dip"
android:paddingTop="10dip"
android:textSize="17dip"/>

<!-- Input Name -->
<EditText android:id="@+id/inputName"
android:layout_width="fill_parent"
android:layout_height="wrap_content"
android:layout_margin="5dip"
android:layout_marginBottom="15dip"
android:singleLine="true"/>

<!-- Price Label -->
<TextView android:layout_width="fill_parent"
android:layout_height="wrap_content"
android:text="Price"
android:paddingLeft="10dip"
android:paddingRight="10dip"
android:paddingTop="10dip"
android:textSize="17dip"/>

<!-- Input Price -->
<EditText android:id="@+id/inputPrice"
android:layout_width="fill_parent"
android:layout_height="wrap_content"
android:layout_margin="5dip"
android:layout_marginBottom="15dip"
android:singleLine="true"
android:inputType="numberDecimal"/>

<!-- Description Label -->
<TextView android:layout_width="fill_parent"
android:layout_height="wrap_content"
android:text="Description"
android:paddingLeft="10dip"
android:paddingRight="10dip"
android:paddingTop="10dip"
android:textSize="17dip"/>

<!-- Input description -->
<EditText android:id="@+id/inputDesc"
android:layout_width="fill_parent"
android:layout_height="wrap_content"
android:layout_margin="5dip"
android:layout_marginBottom="15dip"
android:lines="4"
android:gravity="top"/>

<!-- Button Create Product -->
<Button android:id="@+id/btnCreateProduct"
android:layout_width="fill_parent"
android:layout_height="wrap_content"
android:text="Dodaj element"/>

</LinearLayout>
Teraz utwórz nowe działanie, aby wstawić nowy produkt do bazy danych mysql. Utwórz plik klasy i nadaj mu nazwę NewProductActivity.java i wpisz następujący kod. W następującym kodzie
-> Po pierwsze nowe dane produktu są odczytywane z formularza EditText i sformatowane w podstawowe parametry.
-> Zgłoszono żądanie utworzenia_produktu.php w celu utworzenia nowego produktu za pośrednictwem wiadomości HTTP.
-> Po otrzymaniu odpowiedzi json z create_product.php, Jeśli bit sukcesu wynosi 1, widok listy jest odświeżany z nowo dodanym produktem.
NewProductActivity.java
package com.example.androidhive;

import java.util.ArrayList;
import java.util.List;

import org.apache.http.NameValuePair;
import org.apache.http.message.BasicNameValuePair;
import org.json.JSONException;
import org.json.JSONObject;

import android.app.Activity;
import android.app.ProgressDialog;
import android.content.Intent;
import android.os.AsyncTask;
import android.os.Bundle;
import android.util.Log;
import android.view.View;
import android.widget.Button;
import android.widget.EditText;

public class NewProductActivity extends Activity {

// Progress Dialog
private ProgressDialog pDialog;

JSONParser jsonParser = new JSONParser();
EditText inputName;
EditText inputPrice;
EditText inputDesc;

// url to create new product
private static String url_create_product = "http://ip.ip.ip.ip/android/create_product.php";

// JSON Node names
private static final String TAG_SUCCESS = "success";

@Override
public void onCreate(Bundle savedInstanceState) {
super.onCreate(savedInstanceState);
setContentView(R.layout.add_product);

// Edit Text
inputName = (EditText) findViewById(R.id.inputName);
inputPrice = (EditText) findViewById(R.id.inputPrice);
inputDesc = (EditText) findViewById(R.id.inputDesc);

// Create button
Button btnCreateProduct = (Button) findViewById(R.id.btnCreateProduct);

// button click event
btnCreateProduct.setOnClickListener(new View.OnClickListener() {

@Override
public void onClick(View view) {
// creating new product in background thread
new CreateNewProduct().execute();
}
});
}

/**
* Background Async Task to Create new product
* */
class CreateNewProduct extends AsyncTask<String, String, String> {

/**
* Before starting background thread Show Progress Dialog
* */
@Override
protected void onPreExecute() {
super.onPreExecute();
pDialog = new ProgressDialog(NewProductActivity.this);
pDialog.setMessage("Creating Product..");
pDialog.setIndeterminate(false);
pDialog.setCancelable(true);
pDialog.show();
}

/**
* Creating product
* */
protected String doInBackground(String... args) {
String name = inputName.getText().toString();
String price = inputPrice.getText().toString();
String description = inputDesc.getText().toString();

// Building Parameters
List<NameValuePair> params = new ArrayList<NameValuePair>();
params.add(new BasicNameValuePair("name", name));
params.add(new BasicNameValuePair("price", price));
params.add(new BasicNameValuePair("description", description));

// getting JSON Object
// Note that create product url accepts POST method
JSONObject json = jsonParser.makeHttpRequest(url_create_product,
"POST", params);

// check log cat fro response
Log.d("Create Response", json.toString());

// check for success tag
try {
int success = json.getInt(TAG_SUCCESS);

if (success == 1) {
// successfully created product
Intent i = new Intent(getApplicationContext(), AllProductsActivity.class);
startActivity(i);

// closing this screen
finish();
} else {
// failed to create product
}
} catch (JSONException e) {
e.printStackTrace();
}

return null;
}

/**
* After completing background task Dismiss the progress dialog
* **/
protected void onPostExecute(String file_url) {
// dismiss the dialog once done
pDialog.dismiss();
}

}
}
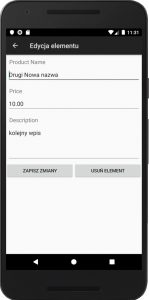
Odczytywanie, aktualizowanie i usuwanie pojedynczego produktu
Jeśli zauważysz AllProductsActivity.java, w widoku listy uruchamiam EditProductAcivity.java po wybraniu pojedynczego elementu listy. Utwórz plik xml o nazwie edit_product.xml i utwórz formularz, który jest taki sam jak create_product.xml.
edit_product.xml
<?xml version="1.0" encoding="utf-8"?>
<LinearLayout xmlns:android="http://schemas.android.com/apk/res/android"
android:layout_width="match_parent"
android:layout_height="match_parent"
android:orientation="vertical" >

<!-- Name Label -->
<TextView android:layout_width="fill_parent"
android:layout_height="wrap_content"
android:text="Product Name"
android:paddingLeft="10dip"
android:paddingRight="10dip"
android:paddingTop="10dip"
android:textSize="17dip"/>

<!-- Input Name -->
<EditText android:id="@+id/inputName"
android:layout_width="fill_parent"
android:layout_height="wrap_content"
android:layout_margin="5dip"
android:layout_marginBottom="15dip"
android:singleLine="true"/>

<!-- Price Label -->
<TextView android:layout_width="fill_parent"
android:layout_height="wrap_content"
android:text="Price"
android:paddingLeft="10dip"
android:paddingRight="10dip"
android:paddingTop="10dip"
android:textSize="17dip"/>

<!-- Input Price -->
<EditText android:id="@+id/inputPrice"
android:layout_width="fill_parent"
android:layout_height="wrap_content"
android:layout_margin="5dip"
android:layout_marginBottom="15dip"
android:singleLine="true"
android:inputType="numberDecimal"/>

<!-- Description Label -->
<TextView android:layout_width="fill_parent"
android:layout_height="wrap_content"
android:text="Description"
android:paddingLeft="10dip"
android:paddingRight="10dip"
android:paddingTop="10dip"
android:textSize="17dip"/>

<!-- Input description -->
<EditText android:id="@+id/inputDesc"
android:layout_width="fill_parent"
android:layout_height="wrap_content"
android:layout_margin="5dip"
android:layout_marginBottom="15dip"
android:lines="4"
android:gravity="top"/>

<LinearLayout android:layout_width="fill_parent"
android:layout_height="wrap_content"
android:orientation="horizontal">
<!-- Button Create Product -->
<Button android:id="@+id/btnSave"
android:layout_width="fill_parent"
android:layout_height="wrap_content"
android:text="Zapisz zmiany"
android:layout_weight="1"/>

<!-- Button Create Product -->
<Button android:id="@+id/btnDelete"
android:layout_width="fill_parent"
android:layout_height="wrap_content"
android:text="Usuń element"
android:layout_weight="1"/>
</LinearLayout>

</LinearLayout>
Utwórz plik klasy dla edit_product.xml i nazwij go EditProductActivity.java i wypełnij go następującym kodem. W następującym kodzie
-> Pierwszy identyfikator produktu (pid) jest odczytywany z zamiarem, który jest wysyłany z widoku listy.
-> Zgłoszono żądanie do get_product_details.php i po uzyskaniu szczegółów produktu w formacie json przeanalizowałem plik json i wyświetliłem go w EditText.
-> Po wyświetleniu danych produktu w formularzu, jeśli użytkownik kliknie przycisk Zapisz zmiany, wysyłane jest kolejne żądanie HTTP do update_product.php w celu przechowywania zaktualizowanych danych produktu.
-> Jeśli użytkownik wybrał przycisk Usuń produkt, wysyłane jest żądanie HTTP do delete_product.php i produkt jest usuwany z bazy danych mysql, a widok listy jest odświeżany z nową listą produktów.
EditProductActivity.java
package com.example.androidhive;

import java.util.ArrayList;
import java.util.List;

import org.apache.http.NameValuePair;
import org.apache.http.message.BasicNameValuePair;
import org.json.JSONArray;
import org.json.JSONException;
import org.json.JSONObject;

import android.app.Activity;
import android.app.ProgressDialog;
import android.content.Intent;
import android.os.AsyncTask;
import android.os.Bundle;
import android.util.Log;
import android.view.View;
import android.widget.Button;
import android.widget.EditText;

public class EditProductActivity extends Activity {

EditText txtName;
EditText txtPrice;
EditText txtDesc;
EditText txtCreatedAt;
Button btnSave;
Button btnDelete;

String pid;

// Progress Dialog
private ProgressDialog pDialog;

// JSON parser class
JSONParser jsonParser = new JSONParser();

// single product url
private static final String url_product_detials = "http://ip.ip.ip.ip/android/get_product_details.php";

// url to update product
private static final String url_update_product = "http://ip.ip.ip.ip/android/update_product.php";

// url to delete product
private static final String url_delete_product = "http://ip.ip.ip.ip/android/delete_product.php";

// JSON Node names
private static final String TAG_SUCCESS = "success";
private static final String TAG_PRODUCT = "product";
private static final String TAG_PID = "pid";
private static final String TAG_NAME = "name";
private static final String TAG_PRICE = "price";
private static final String TAG_DESCRIPTION = "description";

@Override
public void onCreate(Bundle savedInstanceState) {
super.onCreate(savedInstanceState);
setContentView(R.layout.edit_product);

// save button
btnSave = (Button) findViewById(R.id.btnSave);
btnDelete = (Button) findViewById(R.id.btnDelete);

// getting product details from intent
Intent i = getIntent();

// getting product id (pid) from intent
pid = i.getStringExtra(TAG_PID);

// Getting complete product details in background thread
new GetProductDetails().execute();

// save button click event
btnSave.setOnClickListener(new View.OnClickListener() {

@Override
public void onClick(View arg0) {
// starting background task to update product
new SaveProductDetails().execute();
}
});

// Delete button click event
btnDelete.setOnClickListener(new View.OnClickListener() {

@Override
public void onClick(View arg0) {
// deleting product in background thread
new DeleteProduct().execute();
}
});

}

/**
* Background Async Task to Get complete product details
* */
class GetProductDetails extends AsyncTask<String, String, String> {

/**
* Before starting background thread Show Progress Dialog
* */
@Override
protected void onPreExecute() {
super.onPreExecute();
pDialog = new ProgressDialog(EditProductActivity.this);
pDialog.setMessage("Ładuję elementy. \nProszę czekać...");
pDialog.setIndeterminate(false);
pDialog.setCancelable(true);
pDialog.show();
}

/**
* Getting product details in background thread
* */
protected String doInBackground(String... params) {

// updating UI from Background Thread
runOnUiThread(new Runnable() {
public void run() {
// Check for success tag
int success;
try {
// Building Parameters
List<NameValuePair> params = new ArrayList<NameValuePair>();
params.add(new BasicNameValuePair("pid", pid));

// getting product details by making HTTP request
// Note that product details url will use GET request
JSONObject json = jsonParser.makeHttpRequest(
url_product_detials, "GET", params);

// check your log for json response
Log.d("Single Product Details", json.toString());

// json success tag
success = json.getInt(TAG_SUCCESS);
if (success == 1) {
// successfully received product details
JSONArray productObj = json
.getJSONArray(TAG_PRODUCT); // JSON Array

// get first product object from JSON Array
JSONObject product = productObj.getJSONObject(0);

// product with this pid found
// Edit Text
txtName = (EditText) findViewById(R.id.inputName);
txtPrice = (EditText) findViewById(R.id.inputPrice);
txtDesc = (EditText) findViewById(R.id.inputDesc);

// display product data in EditText
txtName.setText(product.getString(TAG_NAME));
txtPrice.setText(product.getString(TAG_PRICE));
txtDesc.setText(product.getString(TAG_DESCRIPTION));

}else{
// product with pid not found
}
} catch (JSONException e) {
e.printStackTrace();
}
}
});

return null;
}

/**
* After completing background task Dismiss the progress dialog
* **/
protected void onPostExecute(String file_url) {
// dismiss the dialog once got all details
pDialog.dismiss();
}
}

/**
* Background Async Task to Save product Details
* */
class SaveProductDetails extends AsyncTask<String, String, String> {

/**
* Before starting background thread Show Progress Dialog
* */
@Override
protected void onPreExecute() {
super.onPreExecute();
pDialog = new ProgressDialog(EditProductActivity.this);
pDialog.setMessage("Zapisuję dane ...");
pDialog.setIndeterminate(false);
pDialog.setCancelable(true);
pDialog.show();
}

/**
* Saving product
* */
protected String doInBackground(String... args) {

// getting updated data from EditTexts
String name = txtName.getText().toString();
String price = txtPrice.getText().toString();
String description = txtDesc.getText().toString();

// Building Parameters
List<NameValuePair> params = new ArrayList<NameValuePair>();
params.add(new BasicNameValuePair(TAG_PID, pid));
params.add(new BasicNameValuePair(TAG_NAME, name));
params.add(new BasicNameValuePair(TAG_PRICE, price));
params.add(new BasicNameValuePair(TAG_DESCRIPTION, description));

// sending modified data through http request
// Notice that update product url accepts POST method
JSONObject json = jsonParser.makeHttpRequest(url_update_product,
"POST", params);

// check json success tag
try {
int success = json.getInt(TAG_SUCCESS);

if (success == 1) {
// successfully updated
Intent i = getIntent();
// send result code 100 to notify about product update
setResult(100, i);
finish();
} else {
// failed to update product
}
} catch (JSONException e) {
e.printStackTrace();
}

return null;
}

/**
* After completing background task Dismiss the progress dialog
* **/
protected void onPostExecute(String file_url) {
// dismiss the dialog once product updated
pDialog.dismiss();
}
}

/*****************************************************************
* Background Async Task to Delete Product
* */
class DeleteProduct extends AsyncTask<String, String, String> {

/**
* Before starting background thread Show Progress Dialog
* */
@Override
protected void onPreExecute() {
super.onPreExecute();
pDialog = new ProgressDialog(EditProductActivity.this);
pDialog.setMessage("Usuwam element...");
pDialog.setIndeterminate(false);
pDialog.setCancelable(true);
pDialog.show();
}

/**
* Deleting product
* */
protected String doInBackground(String... args) {

// Check for success tag
int success;
try {
// Building Parameters
List<NameValuePair> params = new ArrayList<NameValuePair>();
params.add(new BasicNameValuePair("pid", pid));

// getting product details by making HTTP request
JSONObject json = jsonParser.makeHttpRequest(
url_delete_product, "POST", params);

// check your log for json response
Log.d("Delete Product", json.toString());

// json success tag
success = json.getInt(TAG_SUCCESS);
if (success == 1) {
// product successfully deleted
// notify previous activity by sending code 100
Intent i = getIntent();
// send result code 100 to notify about product deletion
setResult(100, i);
finish();
}
} catch (JSONException e) {
e.printStackTrace();
}

return null;
}

/**
* After completing background task Dismiss the progress dialog
* **/
protected void onPostExecute(String file_url) {
// dismiss the dialog once product deleted
pDialog.dismiss();

}

}
}
Klasa parsera JSON
Użyjemy klasy Parser JSON, aby pobrać dane JSON z adresu URL. Ta klasa obsługuje dwie metody żądania HTTP GET i POST, aby uzyskać json z adresu URL.
JSONParser.java
package com.example.androidhive;

import java.io.BufferedReader;
import java.io.IOException;
import java.io.InputStream;
import java.io.InputStreamReader;
import java.io.UnsupportedEncodingException;
import java.util.List;

import org.apache.http.HttpEntity;
import org.apache.http.HttpResponse;
import org.apache.http.NameValuePair;
import org.apache.http.client.ClientProtocolException;
import org.apache.http.client.entity.UrlEncodedFormEntity;
import org.apache.http.client.methods.HttpGet;
import org.apache.http.client.methods.HttpPost;
import org.apache.http.client.utils.URLEncodedUtils;
import org.apache.http.impl.client.DefaultHttpClient;
import org.json.JSONException;
import org.json.JSONObject;

import android.util.Log;

public class JSONParser {

static InputStream is = null;
static JSONObject jObj = null;
static String json = "";

// constructor
    public JSONParser() {
        StrictMode.ThreadPolicy policy = new StrictMode.ThreadPolicy.Builder().permitAll().build();
        StrictMode.setThreadPolicy(policy);
    }

// function get json from url
// by making HTTP POST or GET mehtod
public JSONObject makeHttpRequest(String url, String method,
List<NameValuePair> params) {

// Making HTTP request
try {

// check for request method
if(method == "POST"){
// request method is POST
// defaultHttpClient
DefaultHttpClient httpClient = new DefaultHttpClient();
HttpPost httpPost = new HttpPost(url);
httpPost.setEntity(new UrlEncodedFormEntity(params));

HttpResponse httpResponse = httpClient.execute(httpPost);
HttpEntity httpEntity = httpResponse.getEntity();
is = httpEntity.getContent();

}else if(method == "GET"){
// request method is GET
DefaultHttpClient httpClient = new DefaultHttpClient();
String paramString = URLEncodedUtils.format(params, "utf-8");
url += "?" + paramString;
HttpGet httpGet = new HttpGet(url);

HttpResponse httpResponse = httpClient.execute(httpGet);
HttpEntity httpEntity = httpResponse.getEntity();
is = httpEntity.getContent();
}

} catch (UnsupportedEncodingException e) {
e.printStackTrace();
} catch (ClientProtocolException e) {
e.printStackTrace();
} catch (IOException e) {
e.printStackTrace();
}

try {
BufferedReader reader = new BufferedReader(new InputStreamReader(
is, "iso-8859-1"), 8);
StringBuilder sb = new StringBuilder();
String line = null;
while ((line = reader.readLine()) != null) {
sb.append(line + "\n");
}
is.close();
json = sb.toString();
} catch (Exception e) {
Log.e("Buffer Error", "Error converting result " + e.toString());
}

// try parse the string to a JSON object
try {
jObj = new JSONObject(json);
} catch (JSONException e) {
Log.e("JSON Parser", "Error parsing data " + e.toString());
}

// return JSON String
return jObj;

}
}
Uruchom swój projekt i przetestuj aplikację. Może pojawić się wiele błędów. Zawsze używaj Log Cat do debugowania aplikacji.
W przypadku Android 9 (API 28) mogą się pojawić problemy z komunikacją HTTP. W tym przypadku należy zmienić miejsce definicji biblioteki i utworzyć odwołanie w AndroidManifest.xml
AndroidManifest.xml
<?xml version="1.0" encoding="utf-8"?>
<manifest xmlns:android="http://schemas.android.com/apk/res/android"
    package="com.example.androidhive"
    android:versionCode="1"
    android:versionName="1.0"
    android:hardwareAccelerated="true"
    android:usesCleartextTraffic="true">

    <application
        android:configChanges="keyboardHidden|orientation"
        android:icon="@drawable/inwentory"
        android:label="@string/app_name" >

        <activity
            android:name=".MainScreenActivity"
            android:label="@string/app_name"
            android:launchMode="singleTop">
            <intent-filter>
                <action android:name="android.intent.action.MAIN" />

                <category android:name="android.intent.category.LAUNCHER" />
            </intent-filter>
        </activity>

        <!-- All Product Activity -->
        <activity
            android:name=".AllProductsActivity"
            android:label="Stan majątku"
            android:launchMode="singleTop"
            android:parentActivityName=".MainScreenActivity">
        </activity>

        <!-- Add Product Activity -->
        <activity
            android:name=".NewProductActivity"
            android:label="Dodaj nową pozycję"
            android:launchMode="singleTop"
            android:parentActivityName=".MainScreenActivity">
        </activity>

        <!-- Edit Product Activity -->
        <activity
            android:name=".EditProductActivity"
            android:label="Edycja elementu"
            android:launchMode="singleTop"
            android:parentActivityName=".AllProductsActivity">
        </activity>

       <uses-library
            android:name="org.apache.http.legacy"
            android:required="false" />

     </application>

    <!--  Internet Permissions -->
    <uses-permission android:name="android.permission.INTERNET" />

</manifest>